
Building a Pergola for Your Maryland or Washington, DC, Home
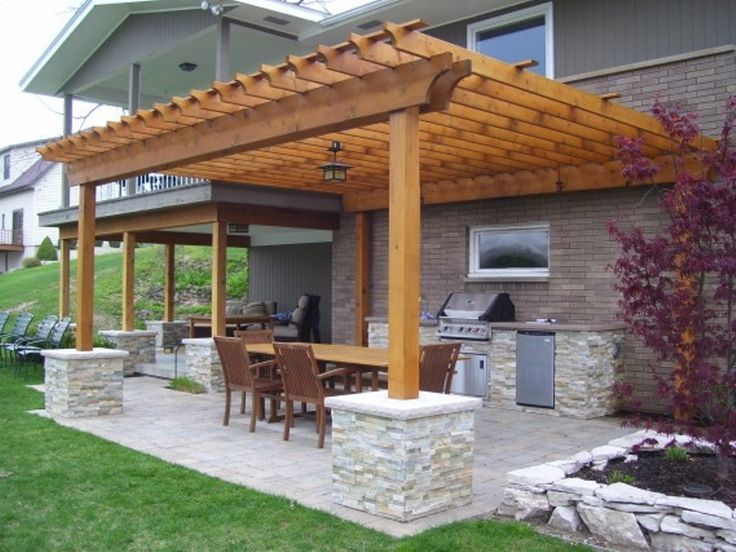
A pergola features vertical posts supporting an open lattice of wooden cross beams. Instead of a full roof, pergolas are covered by horizontal wooden slats, allowing rays of afternoon sunshine to slant through—although this means that rain can get in, too.
Maybe you’re asking yourself, “what’s the point of an outdoor structure that doesn’t keep out precipitation?” But don’t underestimate the pergola! It may lack a full roof, but it has plenty of other uses and abilities that may surprise you.
Pergolas are a lovely spot to spend a sunny afternoon. They’re attractive structures that help to define the perimeter and purpose of your lounging area, and because of their latticed coverings, both sun and breeze can move through them easily. They’re also the perfect spot for your garden greenery, from hanging baskets to potted plants. It’s also easy to train vines through the cross-beams, and the thicker the growth, the more shade – and privacy – your pergola can provide.
But maybe the very best part about pergolas is that they’re super easy to build yourself. You can DIY a pergola yourself with minimal carpentry skills and a handful of budget-friendly materials. You definitely can’t say the same about a gazebo!
Step By Step: How to Build a Pergola
Here’s how you can build a pergola of your very own. These instructions will yield a pergola that is 8×16 feet.
You’ll need:
- Posts: 10 ft. long 4×4 in. boards x 6
- Top beams: 8 ft. long 2×8 in. boards x 8
- Lattice beams: 8 ft. long 2×6 in. boards x 9
- Top lattice beams: 8 ft. long 1×3 in. boards x 18
The Method
- The first step is to select your material. Pressure-treated lumber is an excellent choice, and you can find different options at a variety of price points – ground-contact is more cost-efficient than appearance-grade pressure-treated lumber. Cedar is the most expensive, but it stays gorgeous even as it ages.
- Next, lay your stone or concrete patio pavers. You can also place boards cut to size at a 45-degree angle to create a ‘trim’ around the pavers.
- Mark the post placement. You’ll need to create an even rectangle on flat ground and mark where you’ll place the six evenly-spaced vertical posts. Use a framing hammer and stakes to mark two parallel lines seven feet apart. Each line should consist of three points that are seven feet apart. Use twine to make sure that the posts in each line are straight.
- At each of the six posts, use a post hole digger to dig down three feet below the frost line. Scatter a four-inch layer of crushed gravel at the bottom of each hole, and tamp it down with the post.
- Plumb the post. Pour dry ready-mix concrete into a hole while holding the post vertical—you can check it with a carpenter’s level. Then fill the hole the rest of the way with water.
- Do this with all six posts. You can build a rough wooden tripod to help keep the posts level while they cure. Check them periodically to make sure they’re straight.
- If your post heights are uneven, measure a uniform height with your level and then trim them with a circular saw.
- You can use a speed square to measure and cut a decorative edge on your top beams, but be sure only to cut one side.
- Mount your top beams. The flat side of the board should lay against the top of the vertical post. Use one board on each side of each post. Your top beams should be running down—as opposed to across—the length of your line of posts.
- At each attachment point, drill four pilot holes and affix the boards to the posts with three-inch screws. You should use a total of 16 screws per board. You’ll end up with eight top beams, and the decorative edges should be facing out. The two parallel lines of posts shouldn’t be touching yet.
- Cut decorative edges on both sides of your lattice beams.
- For a perfect tight fit, cut ½ inch notches into each end of your lattice beams with a jigsaw.
- Build the top lattice by laying your lattice beams perpendicular to your top beams, spaced two feet apart. Then lay the top lattice beams perpendicular overtop of that in a grid-like pattern, spaced one foot apart.
- Secure the top lattice beams with 1½ inch screws where the beams intersect.
- For added security, attach the lattice to the beams with hurricane ties and one-inch screws.
Before you start your project, make sure you have all the tools and materials you need. Don’t let your backyard construction project get stuck in pergol-atory! (don’t look that up!) Learn how to build a perfect pergola and how to do it right the first time—but if all else fails, Winthorpe is always here to help. Reach out today, and let’s talk about your next backyard project.
